

Technical SEO isn’t sexy, I agree with you. But your business will miss out of a lot of FREE traffic opportunities if you don’t put your technical SEO house in order.
As a small business owner, there are two ways to go about this:
- Hire an SEO agency to do the dirty technical SEO work for you.
- Do it yourself.
If you have the budget, go for the first option. Else roll up your sleeves and lets get some technical stuff done.
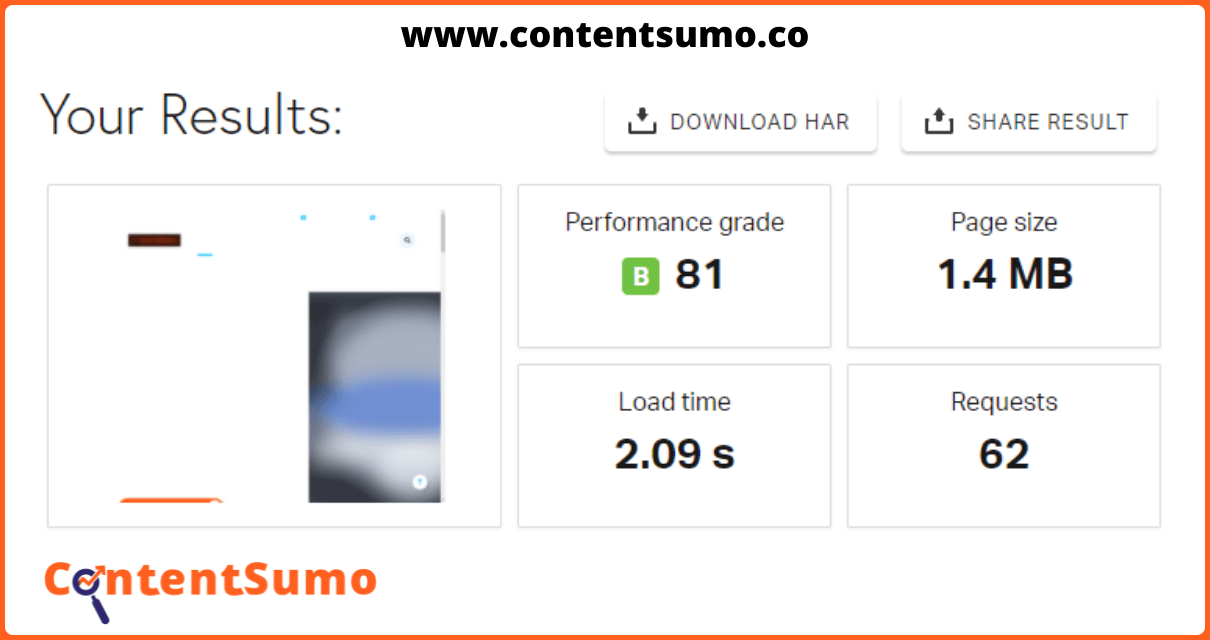
I spent over 50 hours doing technical SEO on this site (contentsumo.co). After 50 hours of foraging the internet and making mistakes along the way, I got it from this
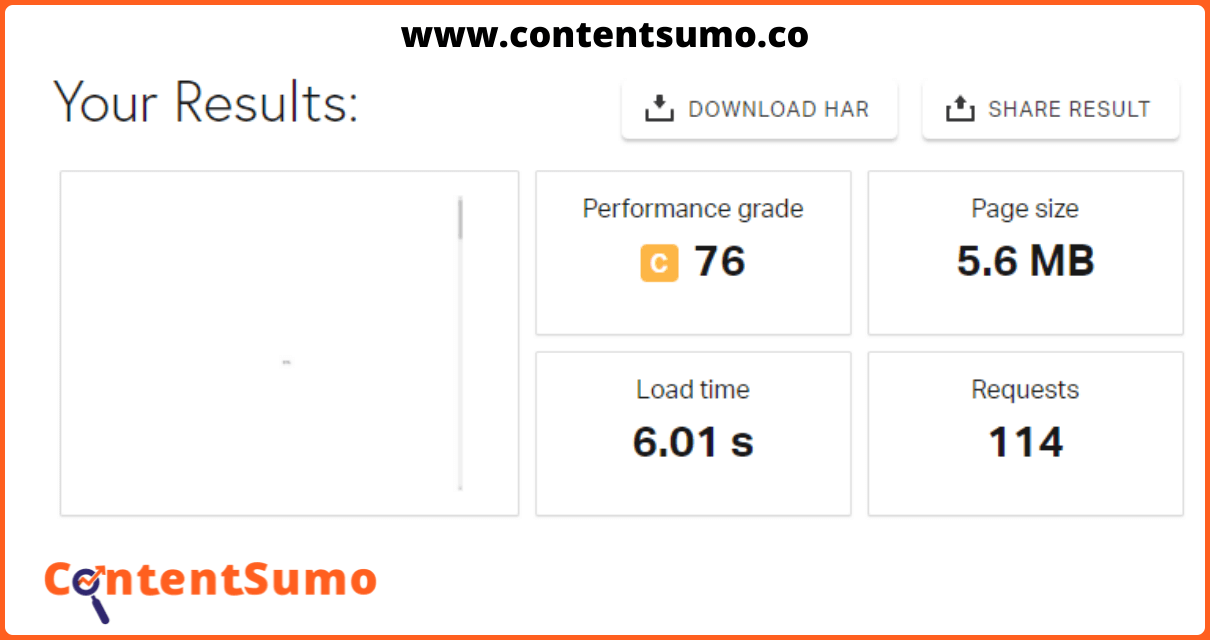
to this
Here’s the good news.
You don’t have to spend 50 hours or a dime on SEO tools or agencies to do this for your site.
In this article, I laid out 12 simple steps (from my experience optimizing my site) you can follow in a matter of a few hours to optimize your site for technical SEO.
That’s not all. I added screenshots at each step so you can see how it works.
Also, I shared links to all the free tools I used. There is no technical jargon in this guide. I explained everything in simple terms and define any technical term that I can’t get rid of.
What Is Technical SEO?
Technical SEO is the house cleaning process that helps you ensure your website meets the technical ranking requirements of Google and other search engines
To meet these technical requirements a lot goes into play:
- Site architecture
- Site security
- URL structure
- File size
- HTTP requests
- Sitemaps
- Bot controls
- Content quality
- Structured data
- Page redirects
- Broken links
And more.
I know you may be thinking these look technical. While these may look technical, I explained them in simple terms in the 12 steps that follow.
Google consistently reviews their ranking system and there are 100s of ranking factors. However, security, page loading speed, ease of crawling and indexing are three factors that are going nowhere soon. Technical SEO helps you speed up your site and ensure Googlebot (the name for Google web crawler) and other search bots can navigate it easily and index your pages faster.
In this guide, we focus on just the technical SEO factors you need to speed up your site and get found by Google faster.
Note: The explanations in this guide are for WordPress sites.
Let’s go!
Step 1: Measure Your Site’s Current Performance
There are lots of free tools to measure your site’s performance. These tools grade your site based on load time, size, HTTP requests, and mobile responsiveness.
You may be wondering why you should measure your site’s performance before following the optimization steps outlined in this guide?
It’ll help you see changes in your site as you follow the steps outlined in this guide. Also, it enables you to reverse any action that harms your site.
Here are five free site performance measurement tools you can use:
I used Pingdom because of the simplicity of the report that it provides.
It will interest you to know that you can also combine two or more tools for this process to access different performance metrics. For example, Pingdom does not provide mobile reports, but Google PageSpeed Insight does.
The tools are easy to use. You simply enter your website URL and they take it from there.
Here’s how it looks on Pingdom.
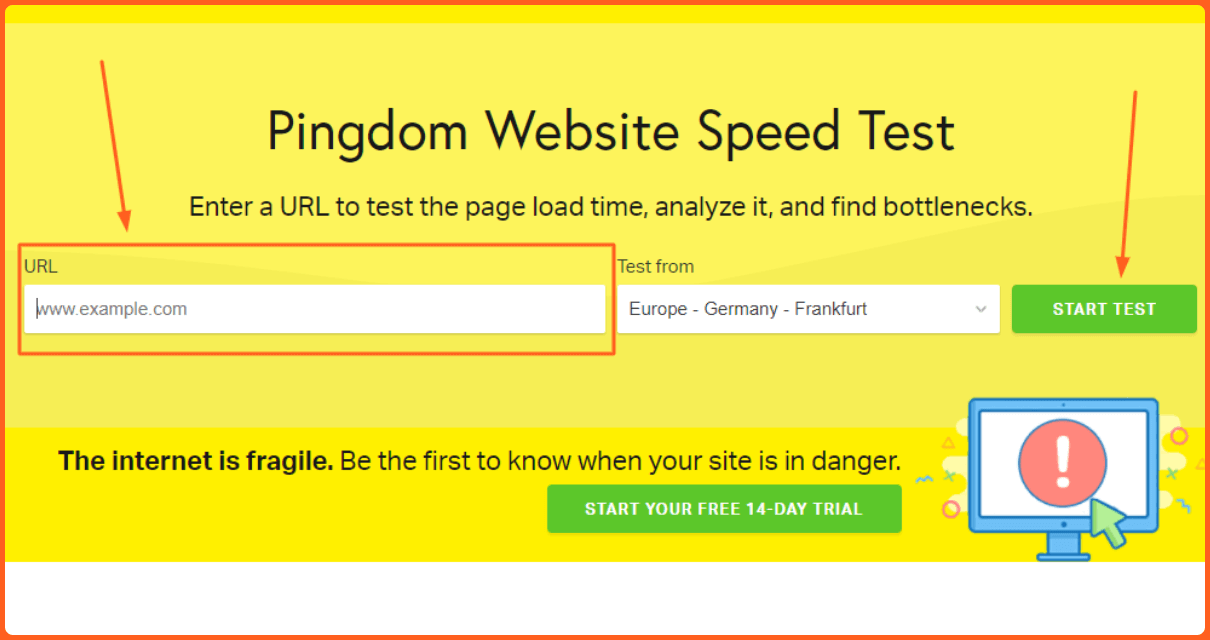
You enter your site’s complete URL and click START TEST.
Save a screenshot of the report you get.
Step 2: Secure Your Site With an SSL Certificate
In 2014, Google added security as a ranking factor to increase the safety of their users’ online information.
Here’s how to know if a site meets Google’s security requirements.
To the left of the address bar, you’d find a padlock sign. Also, if you expand the URL of the pages, you’d see https:// at the beginning of the web address instead of http://. The extra ‘s’ indicate security.

SSL stands for secured sockets layer. And it is a bit of code that encrypts the data on your site and guard users’ information against attack.
If you can find the padlock sign and https:// on your website address bar, then your site is secure. Else, contact your web hosting service provider to add an SSL certificate to your site. This usually comes with every hosting package.
Step 3: Submit a Robot.txt File
Google doesn’t crawl all the pages on your site at a go. It crawls a specific number of pages each time it crawls your site. This is known as crawl budget.
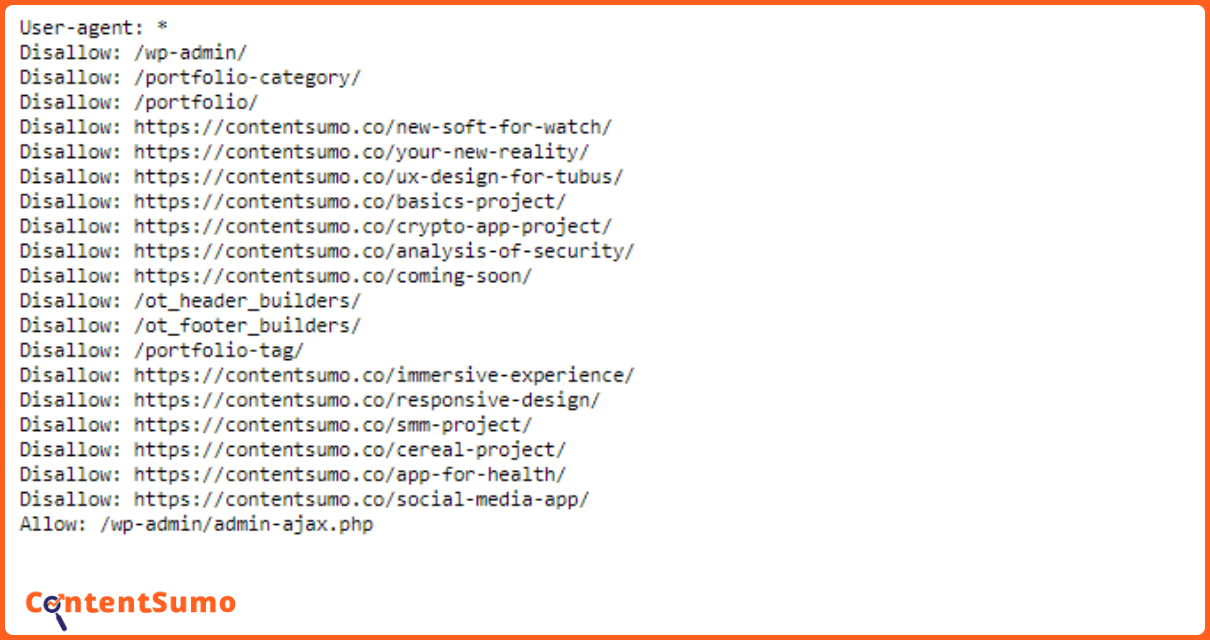
To help Google crawl your entire site (and important pages) faster a robot.txt file provides bot control that defines the list of pages you don’t want Google to crawl.
The robots.txt file is a plain text file that contains links to pages on your website that you don’t want Googlebot and other search bots to crawl. Examples of such pages can include:
- Your admin page
- Non-canonical pages
- Non-index pages
- Duplicate pages
- Hidden pages
- Any page you don’t want searchers to find.
For example, using Ahrefs’ site audit I uncovered lots of boilerplate template pages on my site that I couldn’t delete. I copied the link to these pages and added them to my site’s robots.txt file so search bots only focus on important pages.
The robots.txt file looks like this.
Here’s an explanation of the terms you’d find and use in a robots.txt file.
User-agent is a command that dictates the crawler(s) that should follow the instructions in the file. The asterisks (*) means all bot crawlers.
Disallow means the crawler should not crawl the page or folder that comes after the colon (:). Allow means the crawler should crawl the page and folder that comes after the colon (:).
To view your website’s robots.txt file (and that of any site), add ‘/robots.txt’ (without the quotes) to the end of your homepage web address and press enter. As shown below.

To submit your robots.txt file, download and activate the Yoast plugin. Automatically, Yoast creates a robots.txt file for your website.
To edit the file, navigate to the SEO section on your WordPress dashboard. Click on Tools and select File editor. As shown below.

Yoast opens your robots.txt for you to edit. Always save your changes after editing.

You can use Ahrefs’ site audit to see if your robots.txt file is working.
In Ahrefs start a new site audit crawl and turn off “ignore robots.txt” in the crawl settings. If everything is set up properly, the site audit report will exclude the disallowed pages in your robots.txt file.
Step 4: Implement a Flat Website Architecture
Your site architecture is the arrangement and connection of web pages on your website. It shows how your web pages link to each other and how far they are from your homepage.
The most SEO-friendly website architecture is flat architecture.
In a flat site architecture, all pages on your site are not more than three steps away from your homepage.
How’s does this improve SEO?
A flat site architecture means bots can crawl your site’s pages faster and find all pages easily.
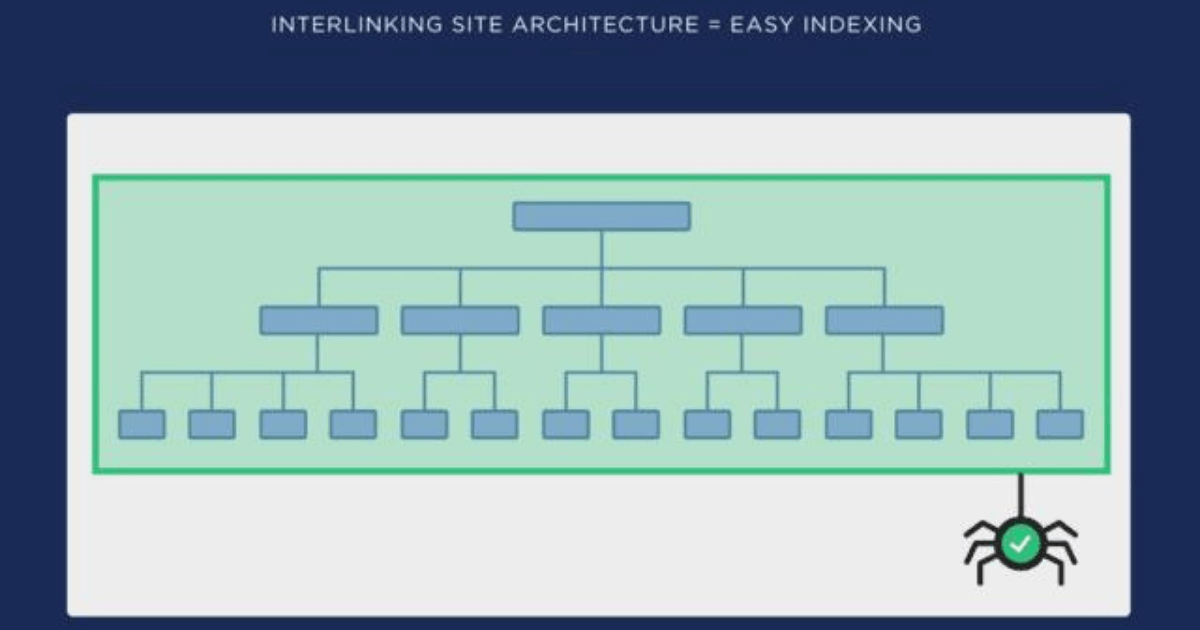
Go through your website and ensure no page is more than three steps away from the homepage. Bring far pages closer by linking to them directly from your homepage or second-tier pages.
Note: Always link pages on your site in a logical flow by putting similar pages into folders. This helps search engine bots to easily understand how your pages relate to one another and effectively index your site.
Step 5: Remove Unused Plugins, JS, and CSS Files and Scripts
When a web page loads, it loads all the files and plugins you used in creating it one after the other through what is known as HTTP requests. Your browser requests for the files from the server storing them, the server responds to the request with the files.
How does this relate to technical SEO?
More files, scripts and plugins mean more HTTP requests. This means a longer page load time. And a longer page load time negatively affects your ranking on search engines.
You’d agree that not all files and plugins on your site are useful.
For instance , you (or your website developer) downloaded some plugins and added some files while building your site that you never used. This is where it becomes interesting. When a user loads a page on your site, all the plugins you installed are loaded. Even though that page does not need the plugin to function.
Here’s a good example.
If you used a form plugin to build the contact form in your contact us page, the plugin also loads when a user loads your about us page or home page — where forms were not created.
All of these pull down your page loading speed.
Here’s how to get rid of unused plugins on your site and across each page.
To delete unused plugins, go to ‘Plugins’ select ‘Installed Plugins’ and deactivate all the plugins you know you don’t use at all on your site.
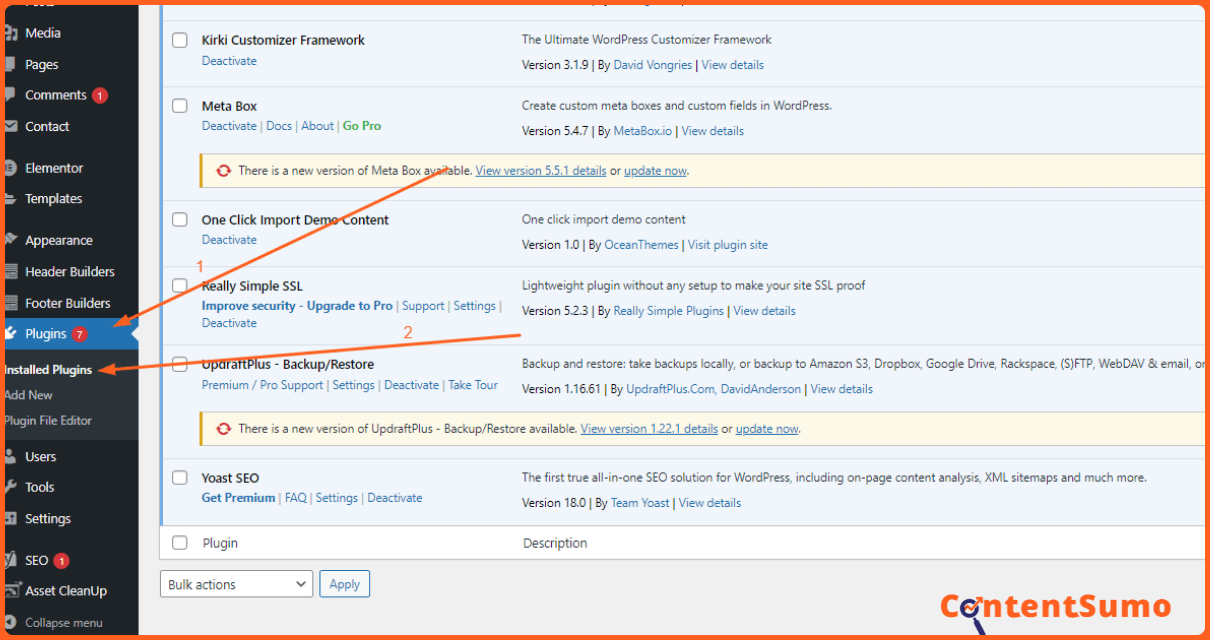
Steer clear from plugins you don’t understand their functions.
To deactivate plugins and unnecessary files on a page-by-page level, you can use the Asset CleanUp plugin.
I explain how below.
Click ‘Plugins’ select “Add New” and type Asset CleanUp in the plugin search box.
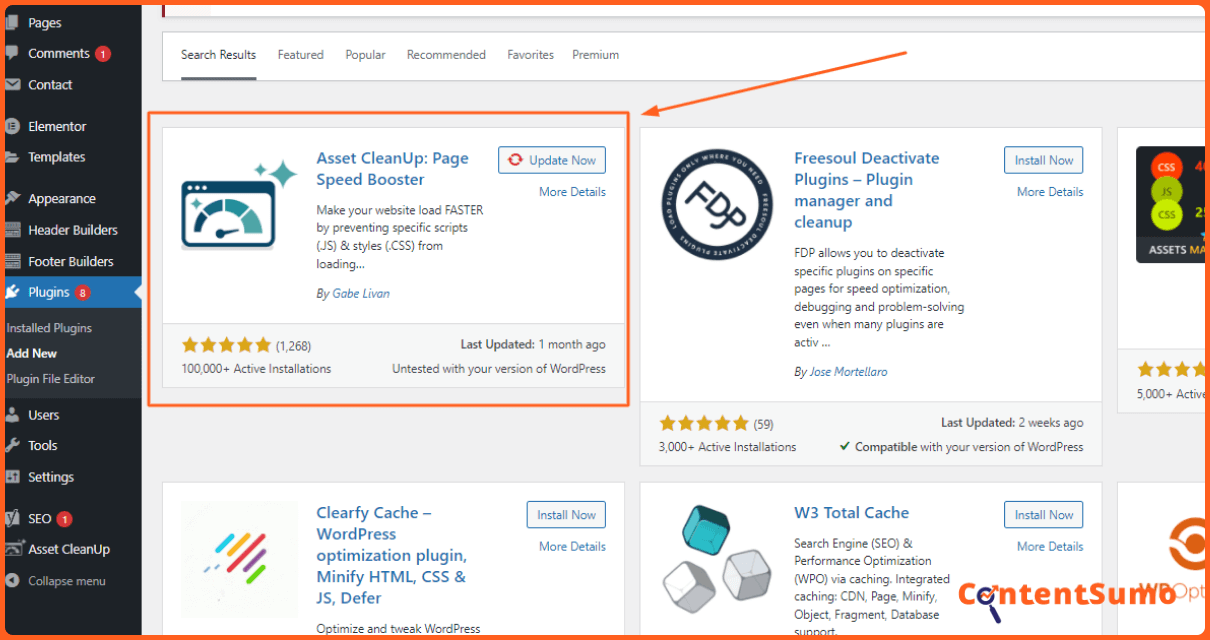
Install and activate the plugin.
To delete unused css and js files on each page. Go to the page, click edit and scroll down. You’d find all the files and scripts that were loaded from plugins and external sources.
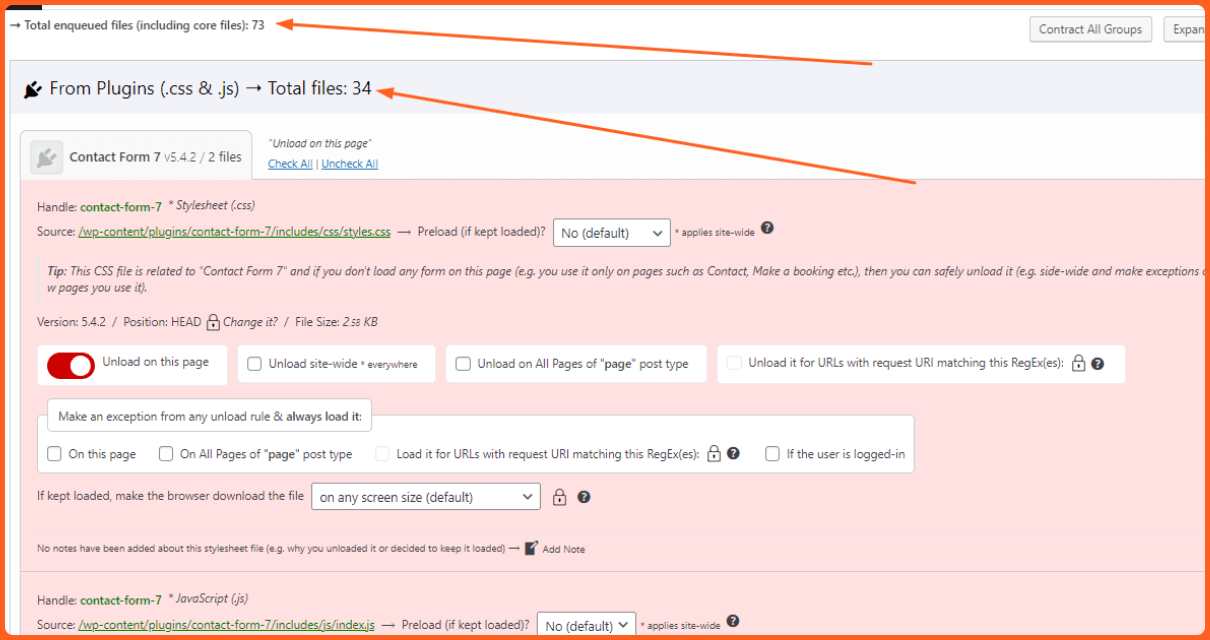
Scroll through the files and ‘Unload’ all the files you know that page does not use.
To unload files safely without breaking your site, reload the web page, on a different tab, each time you ‘Unload’ a file to see if any functionality breaks. If a functionality breaks, uncheck “Unload on this page’ to reactivate it. If no functionality breaks, then that file was probably not used by that page.
Do this for all the plugins that’s loaded for that page. And for all the pages on your website including blogposts. Also, try to steer clear from files you don’t understand.
To enable you carry out a site-wide cleaning, Asset Cleanup provides options to Unload a file for all pages on the site, for a given category or group of pages or create exceptions for a particular page.

Step 6: Minify, Concatenate JS and CSS, Compress and Lazy Load Images and Videos on Your Site
More files and larger files means more HTTP requests and longer load time. Minifying and concatenating your js and css files reduces their sizes (mostly by removing whitespace and extra lines in the file) and combines them together to reduce the number of files on your site (and therefore the number of HTTP requests).
In addition to that, compressing the images on your site reduces their sizes and lazy loading makes your images load last.

These all work together to make your pages load faster.
You can minify and concatenate your site’s js and CSS files manually. You can also compress images before uploading them.
But I love to use the Autoptimize plugin to automate all of these processes.
Install and activate Autoptimize on your website. Navigate to Autoptimize (at the top bar of your site) to set it up.
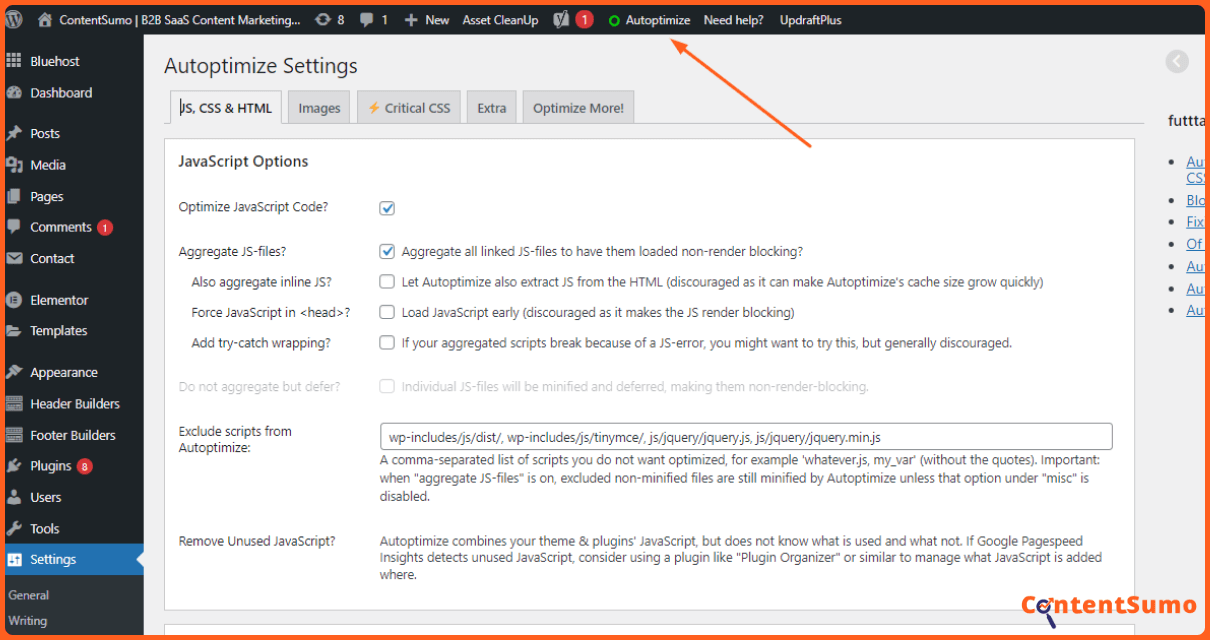
In the js, CSS, and HTML tab, check the following:
- Optimize JavaScript Code?
- Aggregate JS-files?
- Optimize CSS Code?
- Aggregate CSS-files?
- Optimize HTML Code?
Save your changes.
In the images tab check the following:
- Optimize Images
- Load AVIF in supported browsers?
- Lazy-load images?
With this, you’re set to go.
You can exploit other functionalities of Autoptimize. But do it carefully.
Step 7: Create a Simple and Intuitive URL Structure
For technical SEO reasons, your URL structure is everything after the TLD (top-level domain) on the address bar. As shown below.

Source: designpowers.com
A simple and logical URL makes it easy for readers to understand how you organized pages on your website and the content of your webpage even before opening it. This provides a great user experience for your readers.
Google is all about providing a great experience for its users and would reward you for helping readers understand how to navigate your site.
Also, URLs are a ranking factor on Google. A simple URL structure that shows how pages are organized and related makes it easy for bots to crawl your site and rank your pages.
Here’s an example of a good URL structure.

Here’s an example of a poor URL structure.
Here are five tips to create SEO-friendly URLs for your pages
- Use simple words in your URLs. Avoid numbers and random symbols
- Add your primary keyword to your URL
- Separate words on your URL with a hyphen (-) not underscore
- Use only lowercase characters. And don’t miss it up
- Make them short and descriptive
- Avoid prepositions in the URL
- Use a simple and consistent structure.
For example, your landing page can follow the structure domain.com/page-name. Blog posts on your site can look like domain.com/blog/primary-keyword. The same goes for other pages in other categories. Follow the TLD with the category name and then the page name.
If your website contains a lot of pages in multiple subcategories. Follow the same pattern down the hierarchy.
On WordPress, you can edit the URL on the post tab on the right side of your webpage in the editor.

Step 8: Fix Duplicate Content
Google always want to serve searchers with the best and most unique web pages. If two pages on your site have the same content (duplicate content) Google indexes one and deindex the other. If you do not guide Google on the page to index, Google may index the wrong page.
For example, as an e-commerce store, you may have pages with similar content for shoes of the same brand but of different sizes and colours. You have to tell Google which is the original page so the right page is indexed and ranked.
Here are three ways to fix duplicate content:
- Find duplicate content on your site and make each page unique
- Add the ‘no-index’ tag to the duplicate pages
- Add a rel=canonical tag to the original content
The no-index tag tells search bots not to index that page. Also, the rel=canonical tag tells Google that the page is the original page and all others are copies of the page.
You can use Ahrefs’ site audit to find duplicate content on your site and fix them.
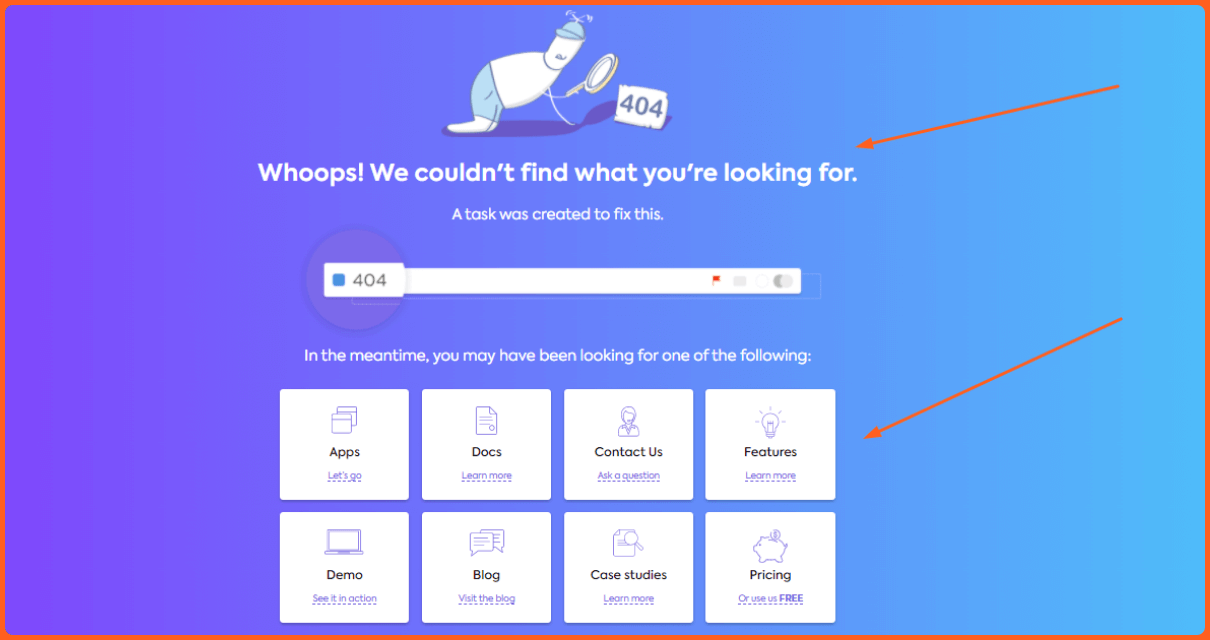
Step 9: Find and Fix Broken Links
Broken links are web pages that no longer exist on your site. Either because you moved the page, deleted the page or changed the URL.
Broken links send the user to a 404 (page-not-found) page.
Too many broken links affects user experience, which can affect your ranking. Also broken links makes you lose out of traffic that comes to the page.
Here are five ways to fix broken links:
- Redirect the affected page (either temporarily or permanently) to a new page
- Update internal links with correct links
- Add useful links to your 404 page to provide users other options to access your site.
Just like ClickUp did.
Step 10: Implement Breadcrumb Navigation
Breadcrumb is the small text path, normally at the top of a page, that shows users their location on a website.
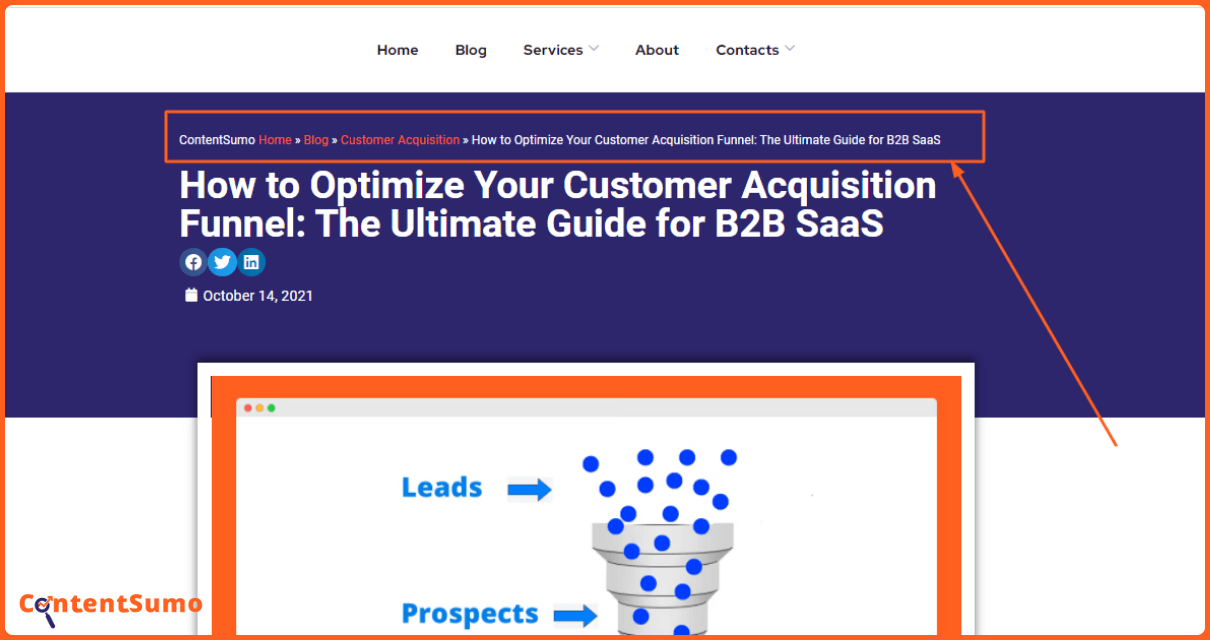
Breadcrumb navigation provides users with an idea of where they are on your site. It also enables users to navigate your site without using the backward and forward button on your browser.
That’s not all. Breadcrumbs automatically add internal links to your site categories. For example, in the screenshot above, ‘Customer Acquisition’ is a category on the blog.
How does this affect ranking and technical SEO?
Easy navigation on your site and automatic linking improve user experience and the internal linking profile of your website. This in turn improves your search engine friendliness.
You can use the Yoast SEO plugin to enable breadcrumb on your site.
Navigate to SEO on the left bar on your WordPress dashboard. Select ‘Search Appearance’ and move to the ‘Breadcrumb’ tab.
Edit the breadcrumb settings as you want, select enable breadcrumb for your theme, and save your settings.
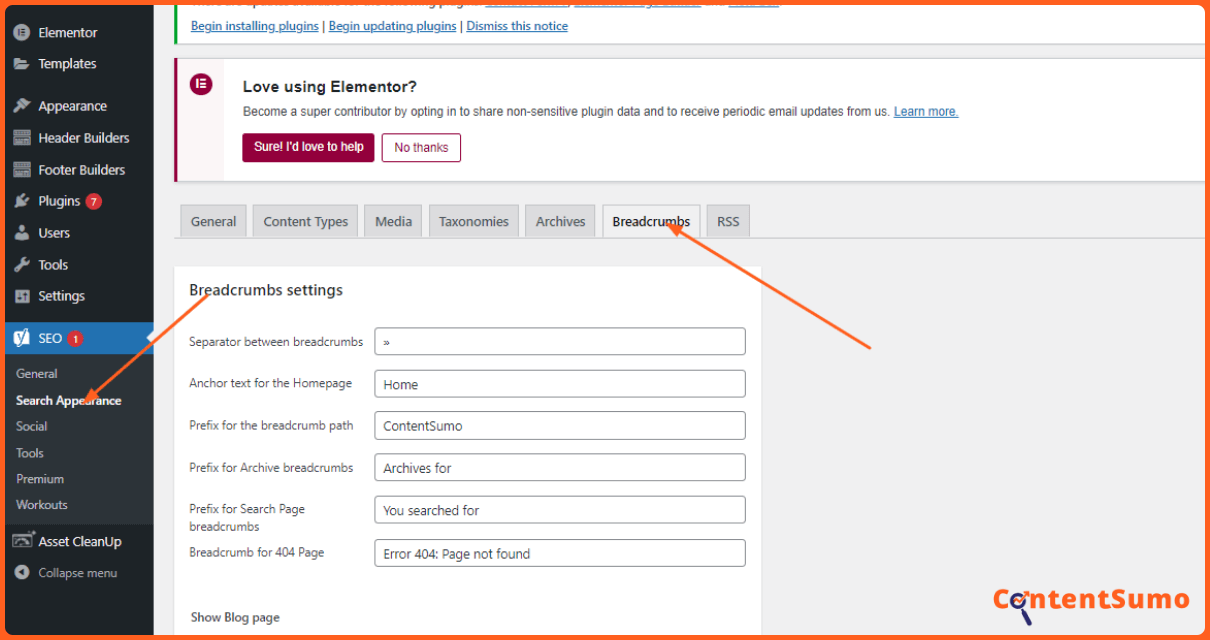
Load a page on your website to see how your site’s breadcrumb navigation looks. Edit your breadcrumb settings on WordPress to make changes.
Step 11: Optimize Your Site for Mobile
Google prioritizes web pages that provide an excellent mobile experience. This is because close to half of the total web traffic comes from mobile devices.
Making your website mobile-friendly increases your chances of ranking high on Google.
You can use Google Mobile-Friendly Tester to check if a page on your site is mobile-friendly.
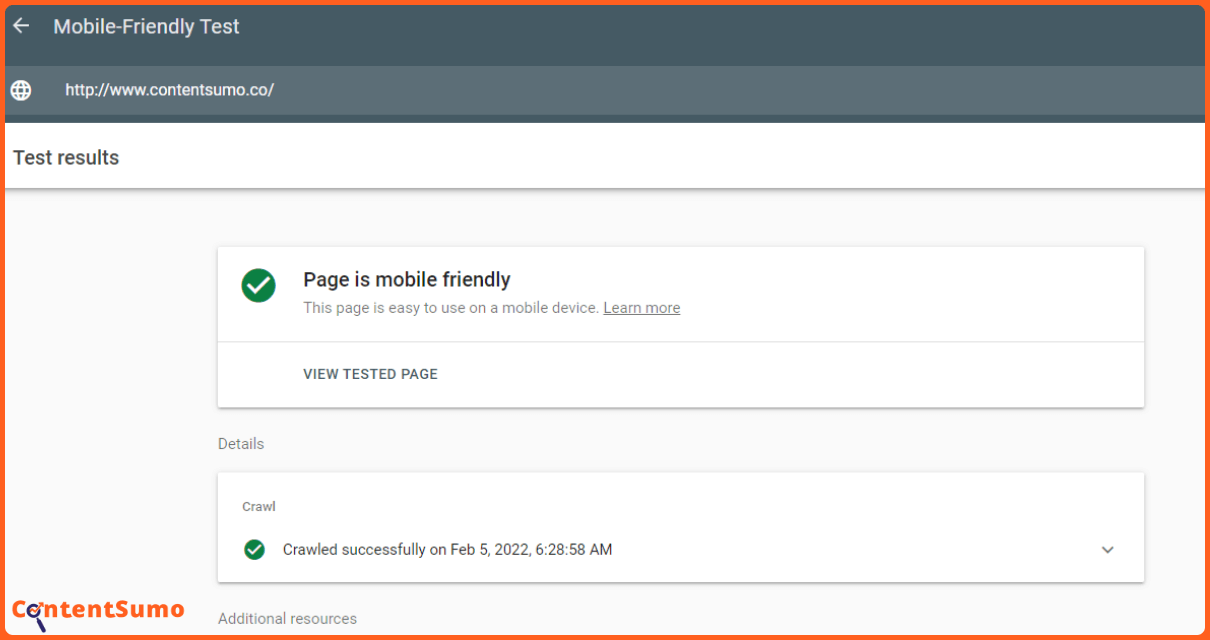
Google Mobile-Friendly Test also provides you with details on why the page is not mobile-friendly so you can make quick fixes.

To check and monitor the mobile-friendliness of your entire website, you can use Google Search Console.
Go to your Google Search Console dashboard and navigate to Mobile Usability.

You’d find the pages that are mobile-friendly, the page with mobile-friendly issues and the errors in the pages so you can fix them.

Clicking on any error will lead you to the pages with the errors.
Step 12: Submit an XML Sitemap
A sitemap is an XML (XML stands for Extensible Markup Language) file that contains all the URLs of the pages on your site.
A sitemap looks like this.

This helps Google to find your pages faster with one visit to your sitemap.
This means instead of crawling them one after the other, Google finds the link to all the pages on your site in one place.
Also, a sitemap contains other details such as when a page was created and the update history
If you have Yoast installed on your site, chances are the plugin has already generated a sitemap for your site.
To view your sitemap, add /sitemap.xml to the end of you website homepage address. Most times what you’d see is a sitemap_indext.xml file. What Yoast does is generate different sitemaps for different page categories (like landing pages, blog posts, etc) and group them into one master sitemap.
Like this

When you click on each individual XML file you’d see the list of URL (and other information about the page) for each category of pages for your site.
You can use Yoast SEO to automatically create a sitemap for your website.
Here’s how to do it. On your WordPress dashboard navigate to SEO, select ‘General’ navigate down the page to XML sitemaps and turn it on, if it’s off. Then click ‘Save changes’. And a sitemap will be created for your site.

After generating the sitemap for your site, you have to submit it to Google via Google Search Console so Googlebots can crawl it and index your web pages.
On Google Search Console select ‘Sitemap’, copy the complete sitemap URL from your site (you’d get it by adding /sitemap.xml to your website homepage address on the address bar, click enter and copy the new URL that you see).
Post the URL in the ‘Add a new sitemap’ field in Google Search Console and click Submit.

After submitting your sitemap to Google, Googlebot will read your sitemap periodically to fetch the links in the sitemap.
Phew!
There you have it. The 12 simple steps to optimize your website for techical SEO.
If you’ve gotten to this point, then your website should be lighter, load faster, more mobile-friendly, and be easier for search engines to navigate.
Keep an eye on your sitemap, and your search performance on Google Search Console. You’d see changes in your page ranking. If there is an error in reading your XML file or indexing any page, you’d find it in the Sitemap section and the Coverage section in Google Search Console.
To see changes in your site performance, run a quick test on Pingdom and compare your site size, speed and performance now with the screenshot you took before you started optimizing your site.
Now that your site is optimized for technical SEO and is lightning fast, you’d need to put systems in place to enjoy the FREE traffic that you’d be getting from your site. Learn how to optimize your customer acquisition funnel and other cool useful resources for small businesses in my blog.
Consider sharing this on LinkedIn or Twitter and sending it to a friend who may need it.